
Part Two Of Building A Motion Detector With Raspberry Pi 3 And Aws
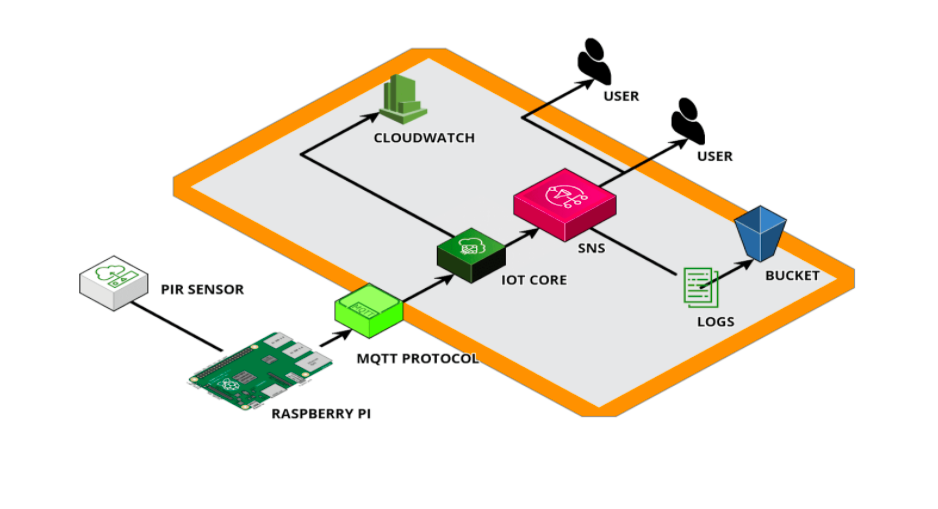
Welcome to part two of building a motion detector with raspberry pi. Today, we are going to focus on harnessing the power of AWS IoT Core and the IoT SDK to have our raspberry pi communicate with cloud resources. Great! However, before we get started…I have to make a few assumptions.
Assumptions:
- Everything from part one is complete.
- An AWS account in compliance with AWS best practices
- Basic familiarity with using the terminal(or a willingness to learn)
- Basic familiarity with programming(or a willingness to learn)
Today we are focusing on setting up communication between the raspberry pi and AWS IoT Core:
1 - Getting Started:
1.1: Go ahead and SSH into your raspberry pi.
ssh raspi@hostname.local
1.2: Now, let’s run some updates and installations to make sure we do not run into any problems later on. Run these commands:
sudo apt-get update
sudo apt-get upgrade
sudo apt-get install cmake
sudo apt-get install libssl-dev
1.3: Nice. Let’s git git up and running(see what I did there(ok, no more jokes(I promise(maybe))). Run this:
sudo apt-get install git
Then, run this:
git --version
2 - Downloading AWS IoT SDK:
2.1: Very good, easy enough, right? If not, check the troubleshooting docs or send me a message.
2.2: I am going to use python for this tutorial, but you can also use JS if you are more familiar with it. However, please note that there will be less support possible from my side if you decide to use JS. If you want to use JS, but are new to all this stuff, start with python, then change it once everything is working. Now, we are finally going to start getting our hands dirty with AWS. The first step is to install the IoT SDK.
2.3 The AWS IoT Core requires python version >3.5. So, firstly, check that you meet that requirement by running:
python3 --version
If you do not, run:
sudo apt install python3
Run the version command again to make sure everything is working.
2.4: Getting the SDK on your machine requires pip three. So, repeat the same process to check for pip3. If you do not have pip3, run this command:
sudo apt install python3-pip3
2.5: Finally, install the SDK using these commands:
cd
python3 -m pip install awsiotsdk
git clone https://github.com/aws/aws-iot-device-sdk-python-v2.git –> sample app.
2.6: Log out of your Raspberrypi
3 - IoT Core, registering a thing, etc
3.1: Ok, this section is pretty much all AWS, so get ready to use the management console.
3.2: First though, we have to create a directory for our Certs that we will get from AWS. Repeat after me: I WILL NOT SHARE THESE CERTS WITH ANYONE BY MINDLESSLY COMMITTING THEM TO GIT, SENDING THEM TO FRIENDS, OR POSTING THEM ONLINE. Ok, let’s go.
Create a certs directory like this:
cd
mkdir certs
And….voila.
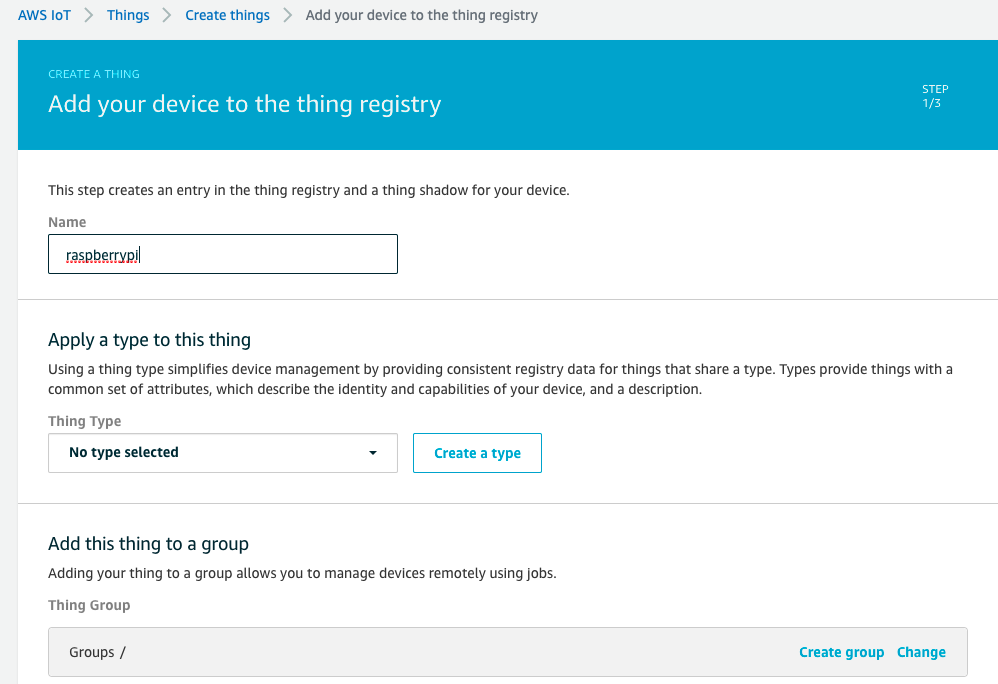
3.3: Now, navigate to IoT Core in the AWS management console. Choose the option “Register a Thing” and then select “Create a single thing”.
3.4: Add a name to your thing and select next. As you can see, I chose “raspberrypi”, but you can choose anything you want! Note, if you choose something else, make sure to rememeber the name for the coding script.
3.5: Choose “One-click certificate creation” and download these certificates to your computer(we will copy them to the raspberry pi later!). Note, this is the only time you will be able to get your certificates, so do not move forward until you have downloaded them.
3.6: Before moving forward, follow the directions to download a root CA for AWS IoT. Make sure to save this root CA as a .pem file. It will not work if it is a .crt or .key.
3.7: Select activate. You can activate the certificates later, but might as well do it now…
3.8: Move to the next step which is attaching a policy to your thing. For this tutorial, I have created a very wide-open policy. I recommend researching AWS policies and deciding which one works best for your case(and also grants the least privileges). If you are just experimenting, that is cool too, create a new policy and copy this:
{
  "Version": "2012-10-17",
  "Statement": [
    {
      "Effect": "Allow",
      "Action": [
        "iot:Connect",
        "iot:Publish",
        "iot:Receive",
        "iot:Subscribe"
      ],
      "Resource": "*"
    }
  ]
}
By default, AWS grants the least possible privileges, so policies explicitly deny resources which makes sense. However, in our case, we have to communicate with cloud resources from the raspberry pi and this policy allows that. In essence, this policy states that the IoT Core is allowed to connect, publish, receive, and subscribe on/to all resources.
3.9: After you have attached the policy, register the thing. Great, we are getting closer to communication between our device and the cloud.
3.10: You now have a thing registered and that is good, but now we have to move the certs from our computer to the raspberry pi using ssh. To do this, ssh into your raspberry pi and navigate to the certs directory, from there run the command:
pwd
Which will print the path of your current directory. Copy this pathway.
3.11: Logout of the raspberry pi and, on your computer, navigate to the folder in which you downloaded the certs from AWS.
3.12: Finally run this command to copy the files to the correct directory(you must fill in your file names, user, and hostname, and paste the pathway from 3.10):
scp private-key.key, device-cert.crt, root-CA.pem pi@hostname.local:/path/to/certs
Enter your password and then give the files an ms to be copied over.
3.13: Log back into your raspberry pi and verify that the certs have transferred correctly.
4 - Writing a little script:
4.1: Ok, almost time to write some code, but before that let’s collect some things we will have to paste in the code to make it functional. Let’s start with the endpoint which we will find in AWS IoT Core.
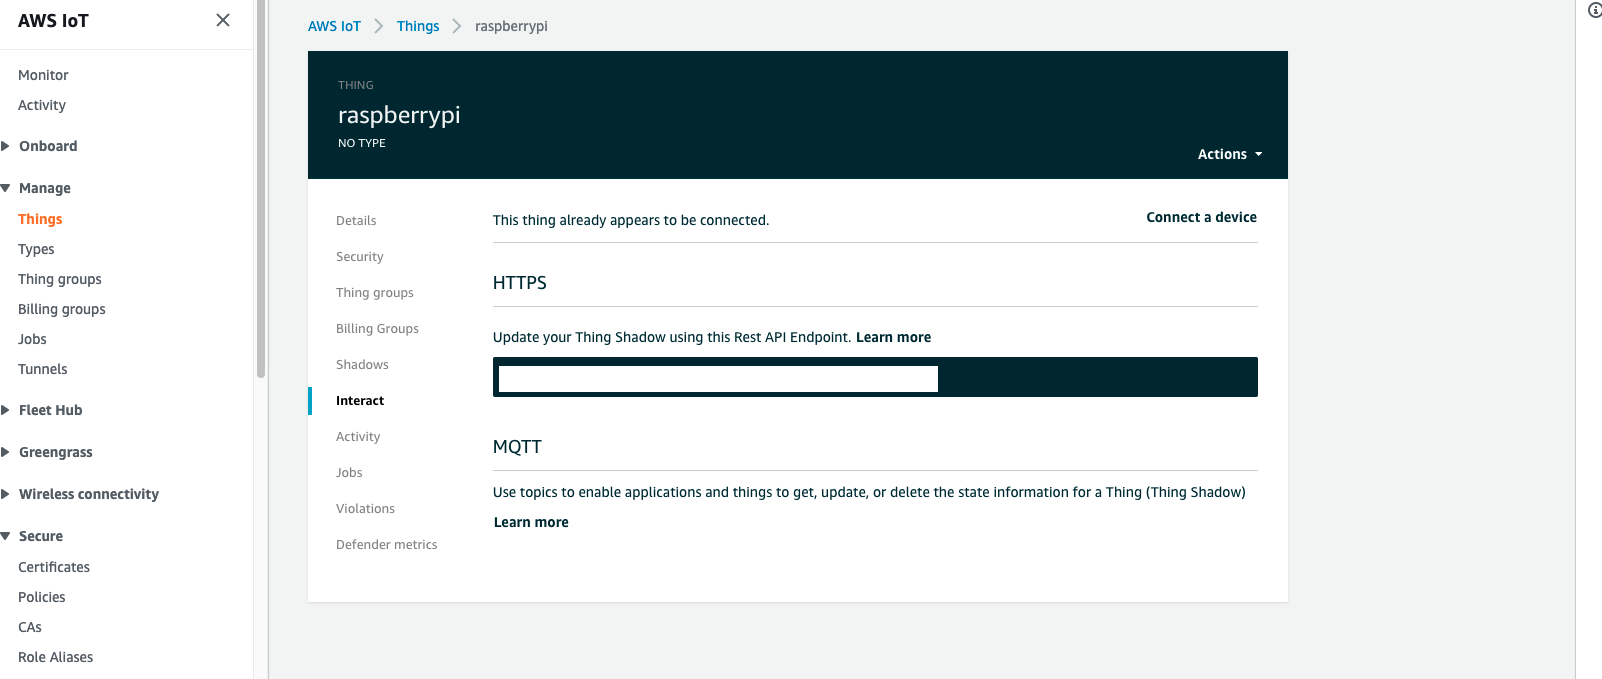
4.2: Open up your AWS IoT console and navigate to the Manage tab, then select “Things”. Choose the one you created for this tutorial, then select interact. At this point you should be here:
4.4: Cool, we are well on our way. On your raspberry pi, create a python script by running:
vim motion-detector.py
In that file, copy this script:
import RPi.GPIO as GPIO
from AWSIoTPythonSDK.MQTTLib import AWSIoTMQTTClient
from time import sleep # for board
from datetime import date, datetime # to get data and time from pi
import json

SENSOR_PIN = 23
GPIO.setmode(GPIO.BCM)
GPIO.setup(SENSOR_PIN, GPIO.IN)

myMQTTClient = AWSIoTMQTTClient("raspberrypi")
myMQTTClient.configureEndpoint("endpoint", 8883)
myMQTTClient.configureCredentials("/home/pi/certs/AmazonRootCA1.pem", "/home/pi/certs/private.pem.key", "/home/pi/certs/certificate.pem.crt")
myMQTTClient.configureOfflinePublishQueueing(-1)
myMQTTClient.configureDrainingFrequency(2)
myMQTTClient.configureConnectDisconnectTimeout(10)
myMQTTClient.configureMQTTOperationTimeout(5)
myMQTTClient.connect()
myMQTTClient.publish("raspberrypi/info", "motion-sensor connected", 0)

def my_callback(channel):
   now = datetime.now()
   time_now = now.strftime("%I:%M:%S %p")
   date_now = now.strftime("%m/%d/%Y")
   motion_message = "motion detected @ sensor 1"

   in_dict = {"date":date_now, "time":time_now, "motion":motion_message}
   payload = json.dumps(in_dict)
   myMQTTClient.publish("raspberrypi/data", payload, 0)
   print(payload)
   sleep(4)
try:
   GPIO.add_event_detect(SENSOR_PIN, GPIO.RISING, callback=my_callback)
   while True:
       time.sleep(100)
except KeyboardInterrupt:
   print("Finish...")
You can also view the commented code here if you are interested in what exactly is going on, or just want more information for the sake of personalization!
4.5: Do not write out of vim quite yet, first we have to fix a few things. Remember finding the endpoint earlier? Cool, well go ahead and copy that and paste it where it says endpoint in this line(inside quotes):
myMQTTClient.configureEndpoint("endpoint", 8883)
4.6: Next, correct the pathway and names of your certification files(remember not to push these anywhere unless they are deactivated) in this line:
myMQTTClient.configureCredentials("/home/pi/certs/AmazonRootCA1.pem", "/home/pi/certs/private.pem.key", "/home/pi/certs/certificate.pem.crt")
Actually, one quick note on this. For all I talk about best practices, I want to be clear that this script does not follow them…you want to be wary about explicitly referencing cert parthways in code. Rather, we should have them as ENV variables or pass them as arguments. That being said, this is the most intuitive way to do this, and opting for explicit reference does give you all a clear picture of what is happening. However, if you plan to have this running consistently or you are doing it for business applications, follow a different method of referencing certs and endpoints. I recommend the method that the AWS Sample App uses which can be found here.
4.7: change the raspberrypi in this line myMQTTClient = AWSIoTMQTTClient("raspberrypi") to whatever you named your device.
4.8: Save and close the vim file by hitting the escape key on your keyboard and then typing :wq
4.9: Take a break! We just did a lot of work.
5 - Testing:
5.1: This is the easiest part!!! So rejoice!!!
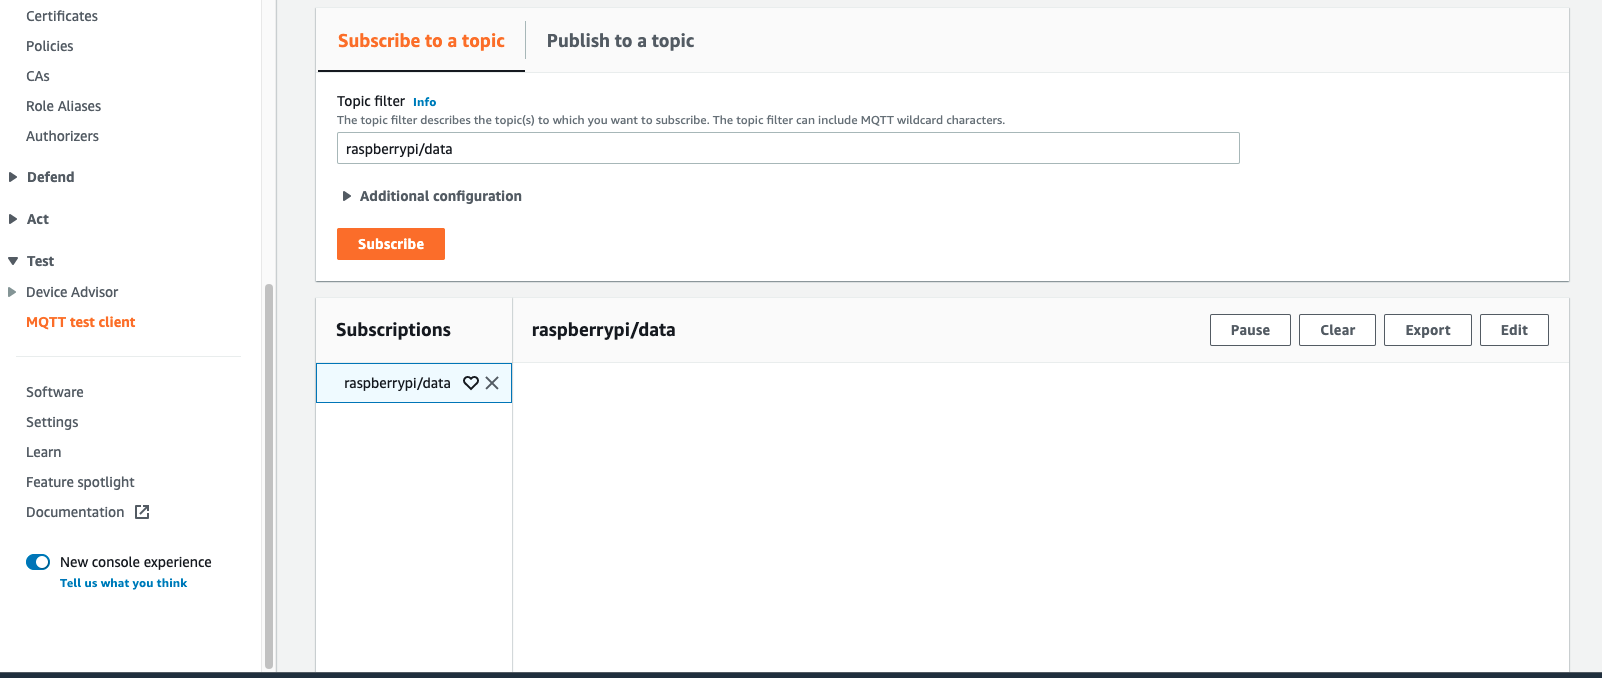
5.2: First, go into the AWS IoT management console and navigate to, then select, the tab name “MQTT test client”. Once you are there subscribe to the topic “raspberrypi/data” which is defined in this line of the script myMQTTClient.publish("raspberrypi/data", payload, 0)
5.3: Great! Now, go log in to your raspberry pi, navigate to the directory where your script is, and run the python script you wrote earlier like this:
python3 motion-detector.py
If you trigger the motion detector, you should see a payload printed to your terminal and a payload in the IoT Core console on the topic we just subscribed to. Here is a video to show it in action if you are a bit lost.
5.4: See you next time where we will add SNS functionality to deliver SMS notifications to users.